Transcend t sonic 650 прошивка.
- Page 1 T.sonic™ 650 User’s Manual...
- Page 3 Kernel 2.4, or Later ................23 Connecting to a Computer ....................24 Transferring Files to the T.sonic..................24 Disconnecting from a Computer ..................26 ® Removing the T.sonic 650 in Windows Me, 2000, XP and Vista ...........26 ™ ™ Remove the T.sonic 650 in Mac OS 10.0 or Later...............26... Page 4 Forgotten Passwords ........................35 Troubleshooting ........................36 Specifications ........................38 Ordering Information......................38 Transcend Limited Warranty ....................39...
Page 5: Introduction
FM radio, advanced digital voice recording, karaoke-style lyrics display, A-B repeat functions and variable track playback speeds. Your T.sonic 650 is equipped with a Hi-speed USB 2.0 interface to transfer data and music files to and from your computer quickly and easily. The A-B repeat and variable track playback speed features allows you to continuously replay specific sections of an audio file at slower or faster speeds –...Page 7: Safety Precautions
In a closed car that is in direct sunlight Backing Up Data Transcend does NOT take any responsibility for data loss or damage during operation. If you decide to store data on your T.sonic, we strongly advise that you regularly backup the data to a computer or other storage medium.Page 9: Oled Display
OLED Display Figure 2: OLED Display ICON INDICATION Indicates the T.sonic is set to auto Power OFF A Sleep Mode Indicates the Repeat/Shuffle modes: Normal, Repeat One, Repeat All, Repeat/Shuffle Shuffle and Repeat Folder Modes Indicates the A-B Repeat mode C A-B Repeat Indicates the Equalizer (EQ) mode: Normal, Classical, Rock, POP, D EQ Mode...Page 11: Power Off
Power OFF Press and hold the button to turn off the T.sonic 650. It takes a few seconds to completely Power OFF the unit. The power OFF animation will be displayed: Play a Song Press to play the currently selected MP3, WMA, or WAV track.Page 13: Music Mode
WAV files can only be played in the Record mode. 3. Press the button to play the MP3/WMA, or WMA-DRM10 music file. T.sonic 650 only supports Mpeg I Layer 3 and WMA files compressed at a rate between 32Kbps – 320Kbps. File Navigator The File Navigator is a fast and convenient way of moving between tracks, files and folders.Page 15: Radio Mode
RADIO Mode Listen to the Radio 1. The Earphones must be plugged in to listen to the Radio. 2. Press the button to go to the Main Menu. 3. Use the buttons to select the “FM” icon and press 4. The current FM radio frequency will be displayed. The first time you use the Radio, the T.sonic will automatically scan all frequencies and save the 20 strongest stations as channel presets (CH).Page 17: Record Mode
RECORD Mode The T.sonic 650 has advanced recording features and is capable of recording audio from 2 different sources: the FM Radio or the Built-In Microphone, both are capable of making very high quality audio recordings. The FM Radio recording feature has been covered in the previous section. (See “Recording the Radio”) Making Voice Recordings with the Built-In Microphone 1.Page 19: Settings
Settings The Settings Menu 1. Press the button to enter the Main Menu. 2. Use the buttons to select the “Settings” icon and press Equalizer (EQ) Mode There are seven equalizer modes to choose from: Normal, Classical, Rock, Pop, Jazz, Bass, and User EQ 1.Page 21: Screen Saver
Screen Saver The T.sonic 650 comes with three screen savers: (1) a blank screen, (2) clock display, (3) song title. The screen saver will commence after a user-adjustable period of time elapses with no button activity. 1. In the SETTINGS menu, use to select the “Screen Saver”...Page 23: About (system Information)
4. Set the T.sonic to “USB” to drag and drop music and other files (except WMA-DRM10) to the T.sonic. About (System Information) Displays the T.sonic 650’s firmware version and available memory capacity. 1. In the SETTINGS menu, use to select the “About” icon...Page 25: Rtc Setting
RTC Setting RTC Setting (Setting the Time and Date) The T.sonic 650’s Real Time Clock (RTC) displays the local date and time - both of which can be adjusted. 1. In the SETTINGS menu, use to select the “RTC Setting” icon and press 2.Page 27: Driver Installation
Figure 7: Mac Installation ™ Driver Installation for Linux Kernel 2.4, or Later No drivers are required. Plug your T.sonic 650 into a USB port and mount it. 1. Create a directory for the T.sonic. Example: mkdir /mnt/T.sonic 2. Mount the T.sonic.- Page 29 If you are using Windows® a new Removable Disk drive with a newly assigned drive letter representing the T.sonic 650 will appear in the My Computer window. Figure 9: The T.sonic 650 shows up as a Removable Disk in the My Computer window *Note: “(F:)” is an example drive letter – your “My Computer" window may differ 3.
Page 31: T.sonic Utility Software
To use the T.sonic Utility, you must log in to the Windows® OS with Administrator rights. Installing the T.sonic Utility Program 1. Put the software CD into your computer’s CD-ROM drive (with Auto-run enabled). 2. The T.sonic 650 Auto-Run window will appear. Figure12: T.sonic Auto-Run window 3. Click on the “T.sonic 650 Utility” button.
Page 32
Figure 14: T.sonic Utility InstallShield Wizard 6. When the T.sonic 650 Utility is finished installing, click the “Finish” button to exit the wizard. Figure 15: Installation complete 7. The T.sonic Utility program can be found in: “...
Page 33: Using The T.sonic Utility Program
™ With the T.sonic Utility, you can: Use the T.sonic 650 to temporarily lock your computer Divide your T.sonic’s memory into public and private partitions Create a password to protect private files on your T.sonic Figure 16: T.sonic Utility Menu...- Page 35 4. You can change the text displayed on the screen while the computer is locked in the “ Screen Saver Message ” field. Figure 19: PC-Lock Screen Saver text 5. You can adjust the period of time that your computer will be locked for with the “Enable Timer” option. Set the Unlock Timer in Hours and Minutes .
Page 37: Partition & Security
Partition & Security This feature allows you to create a secure password-protected area on the T.sonic for your personal files. You can adjust the size of Public and Private areas, and add a password to protect the Private area. Data stored in the Private area will be kept secure and can only be accessed with your password.Page 39: Changing Your Password
Changing your Password 1. Start the T.sonic Utility (-> Programs -> T.sonic Utility) 2. Click on the “ Password ” button in the T.sonic Utility window. Figure 28: T.sonic Utility – Password 3. The New Password window will appear. Input your current Password and New Password, then confirm the new password.- Page 41 Cannot listen to DRM music on my T.sonic 650? 1. The T.sonic 650 only supports WMA-DRM10 protected music files, is this the file type you are using? 2. Did you use the MTP “ Music Transfer Mode ” to transfer music to the T.sonic 650? Sync Lyrics: Why can’t I see the words of the song I am listening to?
Page 43: Transcend Limited Warranty
Duration of Warranty: The Transcend T.sonic 650 is covered by this warranty for a period of two (2) years from the date of purchase. Proof of purchase including the date of purchase is required to collect on the warranty.
Page 2: Table Of Contents
Decrease Volume ..........................7 Main Menu ............................7 Make an Audio Recording........................8 A-B Repeat: Repeat a Section of a Track..................8 Hold..............................8 Reset the T.sonic 650 ........................8 MUSIC Mode ...........................9 Play MP3, WMA, or WMA-DRM10 Music ..................9 File Navigator.............................9 Deleting Music Files.........................10 RADIO Mode .........................11 Listen to the Radio ...........................11...Page 6: Features
Features MP3 Player – supports MP3, WMA, WMA-DRM10 (subscription music) and WAV music formats FM Radio (FM Radio recording and the ability to preset 20 FM radio stations) Advanced Digital Voice Recorder Karaoke-style lyrics display Brilliant, dual-color 4-Line OLED Display produces vibrant clear text easily viewed at any angle and in any light VAD (Voice Activity Detection) for high quality gapless audio recordings A-B repeat function allows you to continuously replay a designated section of a track...Page 8: Player Controls
Player Controls Figure 1. T.sonic 650 Hold Switch Reset Button A-B Repeat/Rec Button Menu Button Headphone Jack Volume Up Button Play/Pause/Power Button Next/Fast-Forward Button Volume Down Button Previous/Rewind Button Hi-Speed Mini USB 2.0 Port Lanyard Attachment Hole Microphone Dual-Color OLED Display...Page 10: Basic Operation
Plug the small end of the USB cable into the Mini USB port on the T.sonic, and plug the large end of the cable into an available USB port on your desktop or notebook computer. The T.sonic 650’s internal Li-ion battery will begin charging.Page 12: Make An Audio Recording
Make an Audio Recording The T.sonic 650 records using is its built-in microphone located on the face of the unit. Press and hold the button for 2 seconds in any mode (except the FM Radio mode) to activate the T.sonic 650’s built-in microphone and begin recording.Page 14: Deleting Music Files
Deleting Music Files 1. In the MUSIC mode, press and hold to enter the File Navigator. 2. Navigate to the file you want to delete with the buttons. (Use to enter folders) 3. With the file highlighted, press the button. A “Delete? yes / no” message will appear. 4.Page 16: Recalling A Saved Station
32 hrs 64 hrs Figure 4: FM Radio Recording Quality Table **If there is not enough space available or the battery power is too low, the T.sonic 650 cannot support the maximum recording capacity as outlined in the above table.Page 18: File Navigator
File Navigator The File Navigator is a fast and convenient way of moving between tracks, files and folders. 1. In the RECORD mode, press and hold the button to enter the File Navigator. 2. The “MICIN.DIR” or “FMIN.DIR” folder will appear, and a list of available recordings will be shown. Use the buttons to move up and down the list.Page 20: Repeat Mode
Repeat Mode There are five repeat modes to choose from: Normal, Repeat One, Repeat All, Shuffle and Repeat Folder 1. In the SETTINGS menu, use to select the “Repeat” icon and press 2. Use the buttons to select the desired repeat mode and press to confirm.Page 22: Fm Reset
T.sonic 650 will rescan all frequencies and save the 20 strongest stations. Language This option adjusts the T.sonic 650’s display language, which includes menus, song/album titles, artist names, and lyrics. The player supports 13 different languages. 1. In the SETTINGS menu, use to select the “Language”...Page 24: Rec Setting
64/128 hrs Figure 6: Recording Quality Table If there is not enough space available or the battery power is too low, the T.sonic 650 cannot support the maximum recording capacity as outlined in the above table. For best results, try to position the T.sonic 650’s Microphone as close as possible to the source of the sound or voice you are recording.Page 26: Day Light (dst)
3. Use to switch between “Enable” or “Disable” and press Enabling Daylight Savings Time will automatically adjust the T.sonic 650’s clock forward or backward one hour, depending on the time of year and the time zone you are in.Page 28: Connecting To A Computer
Transferring Files to the T.sonic If you want to use your T.sonic 650 to listen to music other than the Radio, you must transfer MP3, WMA, or WMA-DRM10 music files to the player. When the T.sonic 650 is connected to a computer it is locked into transferring files.Page 30: Disconnecting From A Computer
™ ™ Remove the T.sonic 650 in Mac OS 10.0 or Later 1. Drag the Disk icon that corresponds to your T.sonic 650 into the trashcan. 2. Unplug your T.sonic 650 from the USB port ™ ™ Remove the T.sonic 650 in Linux Kernel 2.4 or Later...Page 34: Pc-lock
PC-Lock With PC-Lock, you can use your T.sonic as a key to temporarily lock your computer while you are away. ® PC-Lock is only supported in Windows Me, 2000, XP and Vista The PC-Lock function is not supported in the Mac™ or Linux™ Operating Systems. To use the PC-Lock function, you must log in to the Windows OS with Administrator rights.Page 36: Unlock Your Computer
6. Click the “ OK ” button to start the PC-Lock. Figure 21: Start PC-Lock When PC-Lock is enabled, your computer will be locked when the T.sonic is unplugged While your computer is locked, the screen will display the “Screen Saver Message” text. Unlock Your Computer To unlock the computer, you must reconnect your T.sonic to your computer.Page 38: Using The Private Area
Figure 24. Password and Hint 6. Click the “ Start ” button to complete the Partition & Security setup. Using the Private Area 1. Start the T.sonic Utility (-> Programs -> T.sonic Utility) 2. Click on the “ Login/Logout ” button in the “ T.sonic Utility” window. Figure 25: T.sonic Utility –...Page 40: Troubleshooting
1. Is your T.sonic 650 properly connected to the USB port? If not, unplug it and plug it in again. 2. Is your T.sonic 650 connected to the Mac keyboard? If yes, unplug it and plug it into an available USB port on your Mac Desktop.Page 42: Specifications
Erase Cycles: ≥ 90dB Signal-to-Noise Ratio: CE, FCC, BSMI Certificates: 2-years Warranty: Ordering Information Device Description Memory Size Transcend P/N T.sonic 650 MP3 Music Player TS2GMP650 T.sonic 650 MP3 Music Player TS4GMP650 T.sonic 650 MP3 Music Player TS8GMP650...Решил обновить прошивку с версии 1.60 на 1.63. Вообще всем рекомендую обновлять постоянно прошивку, так как добавляются новые возможности, изменяется интерфейс и т.д.
Итак приступим.
Первое что нам надо сделать — это скачать архив с программой:
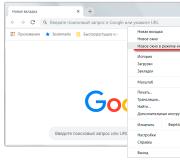
1. Идем по ссылке сюда .
2. Тут последовательно выбираем (сверху-вниз): язык сайта русский(желательно), Товарная группа — Музыкальные проигрыватели, Тип продукта — T.sonic 650, Вид продукта — T.sonic 650, Партномер — TS4GMP650.
3. Следующим шагом является, выбор мини программы для обновления прошивки, в разделе драйвер «Driver». Или скачиваем ее по ссылке .
![]()
На этой странице вообще много всего интересного можно найти для плеера.
Например: Мануал — очень полезно скачать его, если у вас старая прошивка. У меня при покупке плеера была прошивка 1.1, обновил я ее до 1.60, и очень помог мануал, для того что бы выявить новые функции. И кроме мануала, можно найти некоторый полезный софт.
Прежде чем перейти к самому обновлению прошивки, надо:
4. Скопировать все данные с плеера, так как во время прошивки удалятся абсолютно все файлы.
Перейдем к самому процессу обновления прошивки:
5. Извлеките файлы из архива.
Эта программа обновления поддерживает только Windows 2000 и Windows XP(так утверждает производитель, я в свою очередь обновлял под управлением Windows Vista Home Premium). Желательно загрузиться с привилегиями Администратора.
6. Запустите двойным щелчком файл «MP650_V1_63_00.exe».
![]()
7. Отсоедините плеер MP650 от компьютера.
8. Нажмите и держите кнопку «Reset» на MP650 в течение 2 секунд.
9. Нажмите и держите кнопку «Menu» и при этом соедините плеер MP650 с доступным портом USB на компьютере.
Пожалуйста Не используйте порты USB на Вашем мониторе или клавиатуре.
10. В уже ранее запущенной программе нажмите на кнопку «Search Device», чтобы продолжить. «Current Version:00. XX.XX» — такое сообщение будет показано в окне, указывающем, что MP650 был успешно найден. Теперь Вы можете отпустить кнопку «Menu». У меня почему то вывело текущую версию прошивки «Current Version:00. 00.00», я думаю что это не столь важно потому что у меня все обновилось отлично.
![]()
11. Нажмите «ОК», для того чтобы начать обновлять прошивку Вашего MP650.
![]()
12. Процесс обновления закончился, после этого появится сообщение, в котором нажмите «ОК», чтобы закрыть его.
![]()
И на этом все…
Поздравляю Вас с обновлением вашего плеера Transend MP650 4Gb.
Теперь можете приступить к изучению новых функций и измененного интерфейса.
Несколько месяцев назад Transcend представила свой новый MP3-плеер T.sonic 650. По замыслам разработчиков, устройство должно сочетать в себе легкий ультрасовременный дизайн и большой объем памяти. Что же мы увидим на практике - дело другое.
Плеер выполнен в довольно привычном и распространённом дизайне, благодаря чему прост в управлении. Его размеры составляют 75 x 31 x 13 мм, а вес - всего 30 г вместе с литий-ионной батареей, которой, по заявлениям производителя, должно хватить на 15 часов прослушивания музыки.
Плеер обладает встроенным FM-тюнером с рабочим диапазоном от 87 до 108 МГц и возможностью записи с FM и в режиме диктофона в одно касание с функцией Voice Activity Detection. Запись идёт в формат IMA_ADPCM (WAV). Кроме того, плеер поддерживает форматы воспроизведения MP3 с поддержкой ID-тегов, WMA, WAV и даже WMA-DRM10. Существует также 7 предустановленных режимов настройки эквалайзера: Normal, POP, Rock, Classical, Jazz, Bass и Пользовательская настройка.
Соотношение сигнал/шум составляет более 90 dB, что должно самым наилучшим образом отразиться на качестве звука. Корпус выполнен из приятного на ощупь пластика, только лицевая панель глянцевая, однако следов от пальцев незаметно даже при активном использовании - сказывается грамотный выбор цветового оформления. Модели 2 и 8 Гб оформлены в цвете Ivory, 4 Гб модель оформлена в Onyx Black.
В комплекте с плеером также идут наушники, Mini USB кабель, шнурок для ношения плеера на шее, диск с ПО и мануал. На диске можно найти утилиту T.sonic Utility и довольно подробные руководства по использованию, в том числе и на русском языке. Обслуживающая программа для T.sonic включает следующие функции: блокировка компьютера с помощью T.sonic 650, разделение памяти на общую и личную, создание пароля для защиты личных файлов на плеере. Блокировка поддерживается в Windows Me, 2000, ХР и Vista. Также на сайте www.transcendusa.com можно загрузить новую версию прошивки.
Плеер имеет вполне стандартный набор кнопок, разве что отдельную кнопку для диктофона довольно редко можно встретить на обычном MP3-плеере. Блокировка кнопок выполнена в виде движка, что является, наверное, самым простым и удобным решением.
Включение и выключение плеера удержанием в нажатом состоянии кнопки Play давно стало стандартом. Эту же кнопку окружает четырёхпозиционный джойстик, на который завязаны регулировка громкости и перемотка треков, а также навигация по меню.
Кнопка с красной точкой служит для активации записи, а не включения, как считает подавляющее большинство людей, в чьи руки впервые попадает T.sonic 650. Меню довольно простое, представляет собой "ленточную" структуру. При перемотке пунктов меню отображается пиктограмма с подписью внизу.
Дисплей двухцветный, с диагональю 1 дюйм и разрешением 128x64, выполнен по OLED-технологии, что гарантирует максимальную читабельность при любом освещении, включая яркий солнечный свет. Используемые для отображения информации цвета - жёлтый с неоновым. Также такие дисплеи зарекомендовали себя как один из самых экономных вариантов для контрастного и яркого отображения информации.
Наушники произвели положительное впечатление. Я никогда ещё не слышал такого насыщенного звучания в "капельках", которыми комплектуются плееры практически любой ценовой категории.
Transcend очень хорошо сбалансировала характеристики аудиовыхода и возможностей наушников. Длина проводов составляет 1 метр.
При подключении к активной акустике Vigoole E3120 звук также не подкачал. Субъективно качество звучания практически не отличалось от такового при использовании PCI-карты Sound Blaster Live.
Для подключения к ПК и зарядки плеера служит самый обычный и распространённый на сегодняшний день Mini USB (Type B) кабель, который имеет комфортную длину 80 см. Проблем с подключением плеера к портам на передней панели системного блока и непосредственно к портам материнской платы нет. В первом случае ограничение по длине кабеля гарантирует стабильную работу USB-устройств, а во втором случае длины кабеля вполне хватает для комфортного подключения плеера и размещения его на столе либо на самом системнике. Время полной зарядки плеера составляет около 3 часов.
Выводы
У Transcend получился весьма приятный плеер. Радует, что все заявленные производителем характеристики оправдались. Качество изготовления T.sonic на высоте, наушники, идущие в комплекте, заслуживают 10 баллов. Для любителей свободной навигации плеер не подходит, но для прослушивания музыки в течение длительного времени он подойдёт гораздо лучше любого телефона. Стоимость плеера в версии 8 Гб составляет в минской рознице порядка $80. Хоть плеер и казался немного грубоватым при первом знакомстве, за несколько дней обращения с ним стало ясно, что гаджет продуман до мелочей и является на все 100% настоящим удобным MP3-плеером.